Insulation Removal is a dirty and messy job that can expose homeowners to health hazards, rodents, and pests. It’s best left to the professionals, who follow strict safety and disposal guidelines.
Preparation involves clearing the area, sealing off the attic entrance, and laying down protective clothing and equipment. Start at the far end of the attic and work your way back, ensuring no areas are missed. Contact Perth Insulation Remover now!
Insulation removal can be a difficult project for homeowners, but proper preparation and safety measures can help make the process more manageable. Identifying the type of insulation and preparing for its removal can reduce health risks and improve the efficiency of the job.
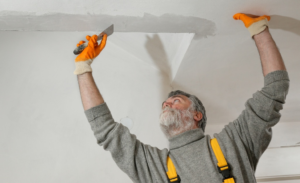
A variety of tools and safety gear can be used to minimize the risk of injury during insulation removal. Personal protective equipment (PPE) can include gloves, a respirator mask, and goggles to protect against dust and allergens. Keeping the workspace clean and sealed off can also minimize the spread of contaminants during the process.
Clearing the area is one of the most important steps for insulation removal, as it prepares the workspace and reduces the risk of tripping or falling over objects. It is also important to look for hazards, such as electrical wires or nails, and to take care to prevent damage to the attic structure. Lastly, it is a good idea to wear a hard hat to protect the head from injury.
The different types of insulation have distinct characteristics that influence the removal process. For example, cellulose is a loose-fill material that can be vacuumed or scooped away, while fiberglass batts are pink or yellow and have a fluffy texture that requires special handling to avoid skin irritation. Insulation removal may require cutting tools to remove rigid panels, such as foam board. Choosing the right tool and identifying what needs to be removed before starting work will ensure a safer, more efficient insulation removal process.
Regardless of the type of insulation, all materials should be disposed of carefully and in compliance with local regulations. For instance, cellulose and spray foam insulation should be contained in special waste bags to avoid the release of harmful fibers into the environment. For other types of insulation, it may be more environmentally-friendly to recycle rather than send them to landfills.
Removing old insulation can be a time-consuming and costly project, but it is an essential part of maintaining a comfortable home. Properly performed insulation removal can save energy costs, improve the overall performance of the home’s insulation system, and create a healthier environment for its occupants.
Preparation
Insulation can be damaged by a variety of factors, including pest infestation, water damage, and general wear and tear. This can result in poor energy efficiency, air quality issues, and health concerns for household members. When this happens, it is often necessary to remove and replace the existing insulation in order to address these problems.
For homeowners who want to perform this task themselves, there are some important things that should be kept in mind. First and foremost, it is essential to follow strict safety guidelines when working with any insulation. This includes wearing gloves, masks, and protective gear when dealing with the loose, blown-in material. It is also important to properly prepare the work area by covering furniture and other areas with plastic. Finally, a high-powered vacuum with a HEPA filter is essential for removing the old insulation.
In addition to these safety precautions, it is important to take into account the complexity of the project when considering DIY insulation removal. This is particularly important for spray foam insulation, which requires specialized tools and techniques to ensure proper disposal and minimal structural damage. For this reason, it is often best to seek professional assistance for these types of projects.
To start the process, it is recommended that homeowners check with local regulations to see if there are any specific requirements for disposing of the old insulation. This will help prevent potential environmental hazards and ensure that the home is in compliance with any applicable laws or guidelines. Once the old insulation is removed, it should be placed in large bags and sealed tightly before being disposed of at a recycling center or waste management facility.
The benefits of removing old insulation in the attic are many. Not only can it improve the overall energy efficiency of the home, but it can also help protect against the damaging effects of pest infestation, mold growth, and water damage. In the end, this can save both money and time by ensuring that the attic is clean and ready for new installation.
Equipment
Insulation removal is an important step in a home improvement project, improving energy efficiency and ensuring a healthy living environment. It removes old, contaminated insulation that can harbor pests and mold growth and negatively impact air quality. Homeowners can choose to perform this project themselves or hire a professional contractor. Both methods require specialized equipment to efficiently complete the task.
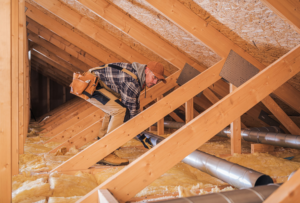
When performing insulation removal, a special vacuum and suction hoses are critical pieces of equipment. A specialized insulation removal vacuum is designed to tackle the specific challenges of blown-in insulation and provides high levels of suction power without compromising maneuverability. This is especially important, as cellulose insulation often contains fine particles that can easily disperse into the air and cause eye, lung, and skin irritation if inhaled.
It is also important to have a rake on hand to break up clumps and transfer them into the vacuum for removal. This helps prevent loose debris from contaminating the rest of your attic space and the living areas below, while also helping to ensure that you can completely remove all insulation from the attic. Finally, you will need a few large garbage bags and a way to transport the bags for proper disposal.
Before beginning work, it is crucial to turn off the electricity in your attic and disconnect any wires that run through the attic space. This will reduce the risk of damage to electrical systems and help to protect your workers from electric shock. It will also make it easier to navigate through the attic and minimize the amount of dust and debris that can enter your living spaces.
Before starting the process, it is also a good idea to spread plastic over furniture and other exposed equipment in your living space. This will help protect it from attic insulation dust and other debris that can cause stains and discoloration. Additionally, it is a good idea to wear appropriate protective equipment like safety goggles and a mask to avoid inhaling potentially harmful insulation particles. A hard hat is also recommended as it can prevent head injuries from low beams and nails.
Disposal
Insulation removal is a complex job, and it’s not something most homeowners want to attempt on their own. It requires specialized equipment to handle and contain particles and fibers during the process. This protects the health of the workers and keeps contaminants from spreading outside of the work area. It also ensures that the work is done safely and efficiently. This is especially important if the insulation contains materials like asbestos, which can be extremely dangerous to work with without proper training and safety protocols.
When choosing a professional service for insulation removal, prioritize companies with ample experience and positive customer feedback. Make sure they use specialized equipment to protect against contaminants that can irritate the eyes and respiratory system, as well as dust masks to safeguard the skin and maintain indoor air quality during the insulation removal and disposal process. This is particularly important if the insulation was installed before 1980 and may contain asbestos, which needs to be tested and properly disposed of according to local regulations.
Local regulations can vary widely in terms of how old insulation must be disposed of and what types are considered hazardous. This is one of the most important aspects of hiring a professional service, as failure to adhere to these guidelines can result in fines or other legal issues for property owners. Professionals are familiar with the regulations for their local area and can provide detailed plans for containment, cleanup, and disposal of the old insulation.
If the insulation is still in good condition, it can often be reused. If the insulation was blown in, such as fiberglass batts or rolls, it can be vacuumed up and blown back into place to fluff and achieve the desired depth again. Cellulose and mineral rock wool insulation can also be reused, as long as they are not contaminated by pests or moisture.
When selecting a professional insulation removal service, consider factors like cost, experience, proper equipment and tools, adherence to regulations, a detailed cleanup plan, and communication. While cost is an important factor, it should not be the only deciding factor. A reputable service will offer a fair price for their services and is willing to discuss any questions or concerns you have throughout the process.